Monday, 1 December 2014

Benefit Liner Swap | Australia Dec 2014


So a couple of days ago I saw on the Benefit Australia Instagram account that they were holding a ‘liner swap’ at their counters across Australia! I thought it sounded too good to be true to trade one of your old liners of ANY brand and ANY size for a sample of their ‘they’re real! push up liner’, but it was so simple! 

I went to my local MYER and made a beeline for the benefit counter, with an old and crappy liner in hand. I asked the very lovely sales assistant how it worked (thinking there had to be a catch, but there wasn’t) and she explained that I give them one of my liners in exchange for a sample of the ‘they’re real! Push up liner’ AND a sample of the ‘they’re real! Remover’ TWO SAMPLES! These are also my first ever benefit products (and I know technically they’re just samples but still!). 


The only thing is that I had to fill out a little form with my contact details (which I’m pretty sure is just for marketing to sign you up to their emailing list). I think it is so worth it because you get to try a new product from Benefit, and you get the benefit (haha see what I did there) of getting rid of an old product you no longer need! Such an innovative concept!
 
The eyeliner I traded in was a cheap liquid liner I got from F21 in Japan a few years ago, I’d only used it once because the liquid gave my eyelids a burning sensation (and I don’t even have sensitive eyes). So I was definitely glad to get rid of it in exchange for something I’m hoping will be better!

I’ve not yet tried these products, but I’ve packed them in my travel makeup bag to test while I’m away on holidays! 

Upon opening the package I was delighted with photos and little descriptions about each product! Plus the packaging was so sleek and beautiful, especially for samples! 


The eyeliner is a gel liner that is dispensed out of the slanted top, it’s quite hard to explain but I’ve never seen anything like this before! I’ve always been a bit sceptical about trying gel eyeliner simply because I would have to apply it like paint (with that being said I’m completely ok with liquid eyeliner, weird right?). 


Following the advice of the sales assistant, I squeezed the tube like upper section of the sample to push the gel to the top of the applicator. I thought it wasn’t working but you just have to give it a couple of squeezes and viol la! 


I did a quick swatch on my hand and it glided so smoothly and it looks like it would create a great winged liner effect.


The remover is supposed to be of a gel consistency but I have not yet opened it, as I’m waiting until a time when I’ll actually use it. Although the sample packet looks large, it does not feel like there’s much in there, but hey I could be wrong, and it was a freebie! 
 
If you’re in Australia and have old eyeliner lying around, get moving to a benefit counter and take advantage of this deal!

If you have tried any of Benefit’s they’re real!  products or any of their other products I would love to hear from you! 

That’s all for now

Sayonara! xo

*This post was not sponsored at all. I wrote this purely because I wanted to.

Sunday, 23 November 2014

Updates! + Priceline Haul

Hello there!

So I'm just here to update you a little bit! Life. I've recently got a second job for the holiday period so I won't have as much free time as I thought, but I will keep posting as much as I can on here.

Also, I've started a YouTube channel! Check out ZoEclectic, I would really appreciate it :) I have been wanting to make videos for a long time but I've only just got the courage to do it! Make sure you stay in the loop for more videos in the coming weeks!

On top of that I have a new instagram account so check that out and give us a follow!

Now that's the formalities out of the way, here is a look at my Priceline haul from their 40% off all cosmetics haul last week!

From left to right, top to bottom: 2x Face of Australia Blush in 'O Peachy!', Sally Hansen Insta Dri Top Coat, Revlon 'Whimsical' Colourburst Lip Gift Pack, Australis Fresh and Flawless Pressed Powder in 'Deep Natural', Maybelline Instant Age Rewind Eraser Dark Circles Concealer in '120 Pale', and Essence Lip Liners in '06 Satin Mauve' and '07 Cute Pink'. 
I'm super excited to use all of this (I've already used some of it and have been loving it!).

Swatches and reviews to come soon!

That's all for now,

Sayonara! xo

Saturday, 15 November 2014

Christmas Lush Products + Review


It's that time of year again! Lush has once again brought out their Halloween and Christmas items and that just makes me so happy! So I popped into my usual store and was devastated to see that they only had a fraction of the Christmas stuff in and they weren't sure when the rest was coming... but I still managed to get some of the things I wanted! There are a few things I'm dying to try so in the words of Arnold Schwarzenegger "I'll be back!".

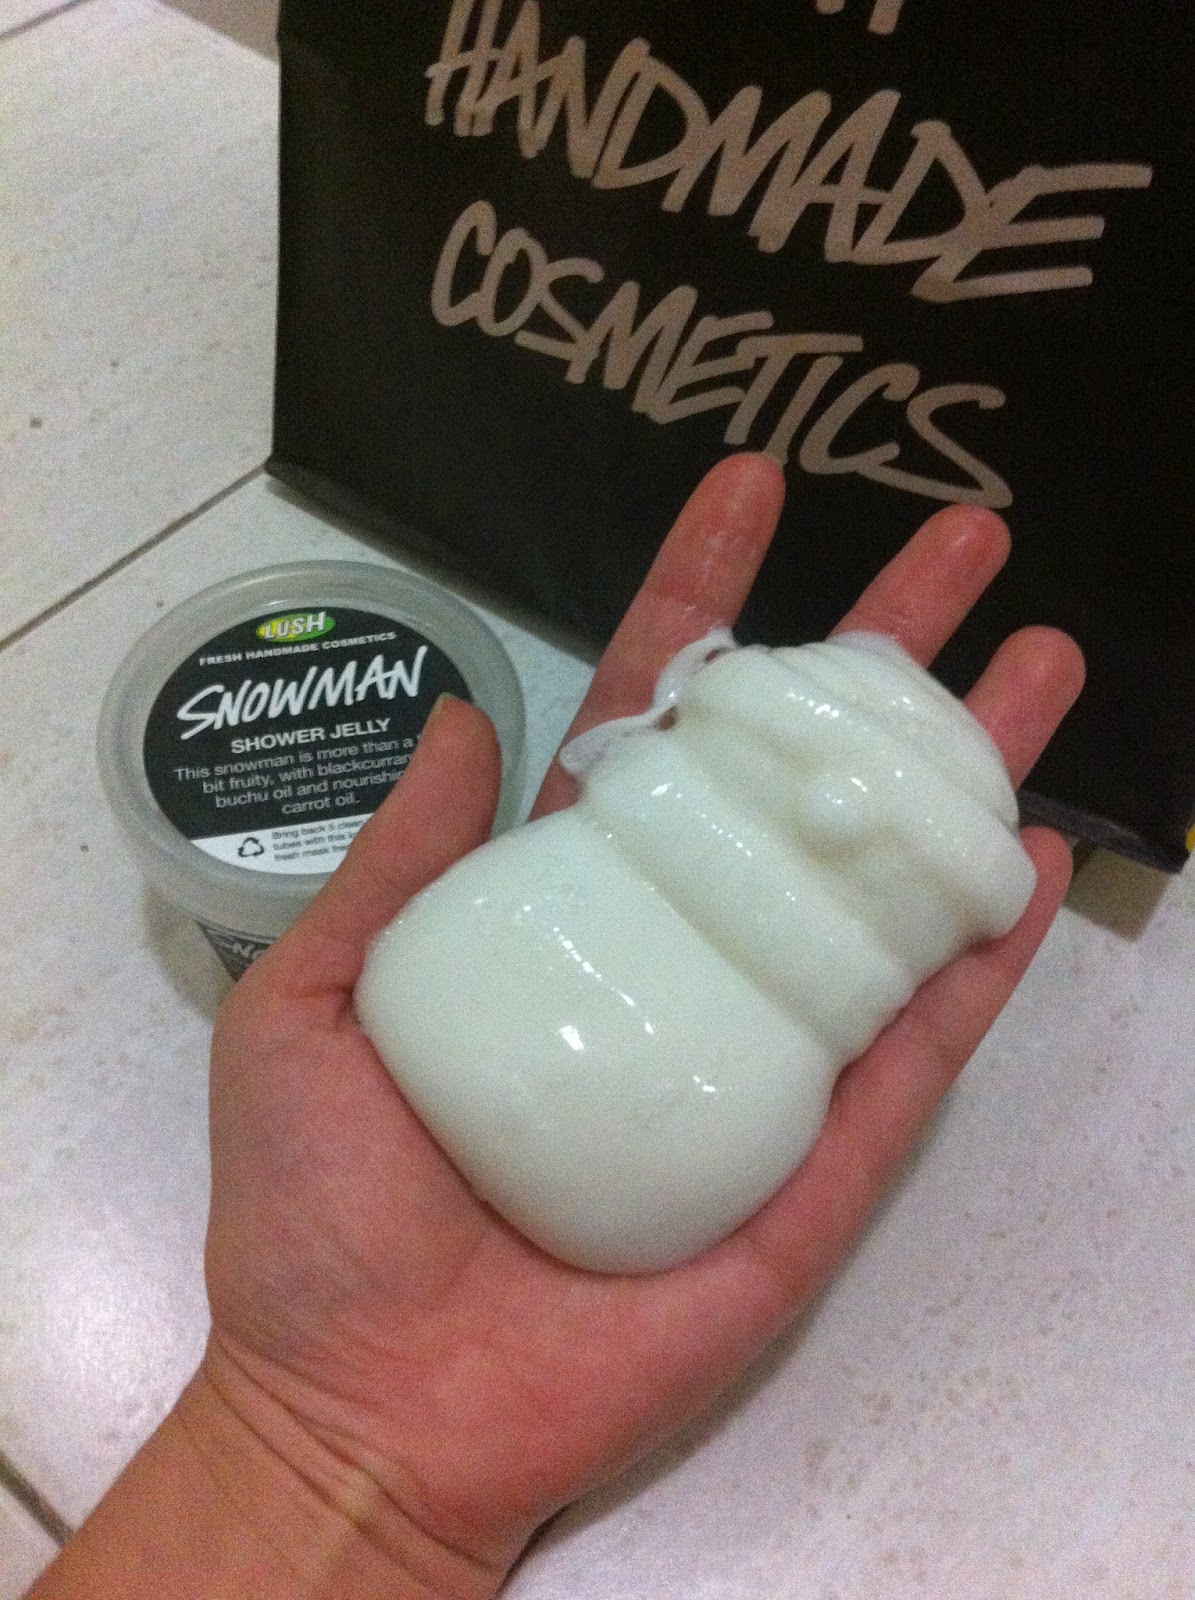
My mini haul: Snowman Jelly (is this new because it's super cute), Snow Angel Bath Melt and Star Light, Star Bright Bath Melt.
Snow Angel $8.50 AUD, Star Light, Star Bright $6.95 AUD.
Both of these bath melts are super sparkly and that's why I love them and the Christmas range so much! Snow angel has iridescent sparkles on top and gold on the bottom, love!
Just look at how much glitter I got on my hands after holding it for a couple of seconds!
Gold layer of glitter on the bottom of snow angel! 
This snowman was so cute and I've always wanted to try one of their jellies so I'll give it a go! And only $6.95 AUD for so much!


*SPOILER ALERT* If you're one of those people who doesn't like to spoil the fun by seeing a lush product in action before you use it, I would recommend not progressing any further in this blog post... If so, thanks for reading, and sayonara! xo


This is my Luxury Lush Pud from last year, and since, they have made it a lot more pink and not so much purple in the bottom layer - oh well it's still fabulous!

This one looked amazing in my bathtub, I just loved the colour, and the scent was so relaxing. Bonus, I figured out that the little piece of holly on top smells like ylang ylang!

As you can see above it is quite a spectacle to watch it fizz away and see the beautiful purple colour emulsify throughout the water.

I highly recommend this bath ballistic if you're in the mood for a fun, colourful but relaxing bath for the senses.

That's all for now

Sayonara! xo

Thursday, 23 October 2014

Soap and Glory Pamper Time + Review

So I quite enjoy having a pamper night after a long week of stressful work, and those seem to be happening a lot lately! These are a few of the things I use to start  off my pamper sessions - all wonderfully scented Soap and Glory products!

Left to right: Flake Away body polish, Clean On Me shower gel, Scrub Actually scrub- and OMG how punny are their names! They always make me laugh! So creative!


The first one I use is the Clean On Me (mini) shower gel just as a normal body wash, and I find that with this a little goes a long way! The scent is the Soap and Glory Original Pink scent - it smells quite fresh and a little sweet and it feels super luscious on the skin! This 75ml bottle was only $5.95 AUD at MYER! These mini's are perfect for travelling or if you're like me and want to try it out before committing to the 500ml ones!

Next I use the Scrub Actually on my upper body. This is a very granular scrub and it takes a lot of scrubbing for the sugar granules to dissolve but it makes your skin feel so smooth and the scent is massaged into your skin. It smells quite sweet but refreshing and contains brown sugar, white sugar and apricot kernel oil. I am in love with it's smell and I strongly suggest you try it! It is probably my favourite seeing as it was my first Soap and Glory purchase. $15.95 AUD at MYER.

The final product I use is the Flake Away body polish and I use it on my legs and feet. Even though it is not advertised as a foot scrub, it works amazingly as one! (especially when paired with the Heel Genius Foot Lotion) This one I did purchase as a mini before committing to the big one because its HUGE, but I was so pleased with it that I had to have the big one! I know this is going to last me a while! This one has the same Original Pink scent as Clean On Me, and is a salt scrub so it's a little harsher on the skin but it works wonders! Only $16.95 at MYER for this massive tub!

I absolutely love a relaxing night with these products and it's so fun mixing and matching their scents and products! If you're in Australia, I know you can find Soap and Glory products in MYER at the Kit Cosmetics counter and at Mecca Maxima.

Happy Shopping! That's all for now!

Sayonara! xo

Tuesday, 21 October 2014

Forever 21 Brisbane Grand Opening + Haul

Ok so I am just a tad obsessed with Forever 21 and have been ever since I fist went there in Tokyo, Japan in 2012. I was always very sad that we didn't have any stores here in Australia, but that all changed on Thursday 16 October 2014!

Forever 21 opened their first ever Forever 21 store right here in Brisbane, wait what? Not Sydney or Melbourne!? Those two cities are the 'mega' cities of Australia and have seen the first of coveted imported brands such as Zara, H&M, UniQlo, Sephora and many more leaving Brisbane left behind... but not this time!

They have opened their first Aussie store in the popular Queen St Mall next to the new 'NEXT' hotel and it is HUGE and beautiful! There are two levels all filled to the max with women's fashion, jewellery, bags, swimwear, active wear, sleepwear and even menswear! There is so much to look at so if you're heading there I would suggest allocating a decent amount of time just getting through the store and looking at everything they have to offer. On top of that, there may be lines to get into the store (as was my case on opening day) and even worse, the fitting room lines!

Opening day I suspect would be the busiest as there were free gifts, DJ, photo booth and a whole lot of fun things, so if you're planning on going it shouldn't be as bad now... but don't count on it, people are going mad over Forever 21!

This was only a third of the line! - they even had security guards and line barriers!
So much excitement as I was about to enter the store!... but I just realised a lovely person decided to dump their maccas drink right in the middle of my photo :(


As I got in line at 10:30AM on opening day, a mere 30 minutes after they opened the store doors for the very first time, I waited for around 30 minutes just to get in. I then spent another 40 minutes trying to navigate through the crowds to check everything out (and ended up with a bag full of stuff to try on). But alas the line for the fitting room was not budging and it was time for me to return to uni :(


My bag full of goodies!

But this is not the end of my Forever 21 story, no, I would not be leaving empty handed after visiting the first Australian store on opening day. I returned later on in the day and was met with a line to enter once again, but this time taking only 10 minutes to get in and the crowds were less frantic. I picked out everything I wanted, tried it on, and then made my first, of many, Aussie Forever 21 purchases! And what made me even happier was that I didn't miss out on  the free gift to opening day customers! (*strictly while stocks lasted) So now let me show you what I bought and I will also let you know about the pricing (compared to US prices).


This is a super cute skort I found in a really cool punk style area of the store. It has a traditional red/green plaid pattern, it looks like a pleated skirt at the front but it's actually a pair of shorts! *Note this is not high waisted. This one cost me $32.80 but, like all the tags in store, it was a sticker over the American price of $19.90.


This deep v-neck floral playsuit caught my eye immediately as something I would love to wear but would never suit me... you know what I mean right? But when I tried it on I loved it! This one was $28.80 AUD, which is a pretty good price, but only $17.80 US! You'd never see a playsuit like this for that price in Australia!


This is a basic red jersey material dress - everyone's gotta have a red dress right? I loved the style of a skater dress with vertical seams instead of the seam along the waistline. This was in the basics area on the lower level and cost $14.80 AUD which is very reasonable! Although the US price is $11.80.


The first thing I heard when entering the store was the lady at the door telling everyone to check out the $12.80 jeans... How cheap is that!? I could not leave without buying a pair, especially at such a good price! I know where I'll be going next winter when I need some jeans! $12.80 AUD compared to $7.90 US. But hey, $12.80 jeans, I'm not complaining!


Last but not least, my final purchase (which would have been my 2nd last purchase if the cashier didn't forget to scan my earrings.. grrrr :( I didn't realise until I left). This is the make-up sponge, of a similar shape to those special sponges that are becoming increasingly popular now, which came in purple (as above) or turquoise. I decided I wanted to give these raved about sponges a go seeing as it was only $6.80 AUD, which is a lot less than other sponges of this sort here, but is more compared to the price of $3.80 which you would pay if you lived in America.

Oops did I not mention my free gift I received as one of the first day shoppers?

It was this cute little triangle that I found sitting at the bottom of my bag that contained some forever 21 earphones! I haven't tried them out, but I'm not expecting much since they were free... Oh well they were free :)
So this concludes my Forever 21 in Australia shopping experience, I hope you enjoyed reading and that you may have a wonderful time if you ever go to Forever 21.

That's all for now

Sayonara! xo

Saturday, 18 October 2014

Healthy Hints - Kale Chips

Ok so you probably wouldn't think that I eat any healthy foods judging by my previous blog posts but those are most of the occasions in which I eat some naughty treats! I am a MASSIVE chips fan, like I can eat a whole bag of potato chips in one sitting, easy. So trying to beat the cravings can be so difficult, but I have stumbled upon a fantastic alternative- kale chips!

Kale has become widely popular recently due to everyone's obsession with 'green smoothies', bulking, 'clean eating' and things like that and one day while I was hanging about the internet (as you do) I found a picture of this.

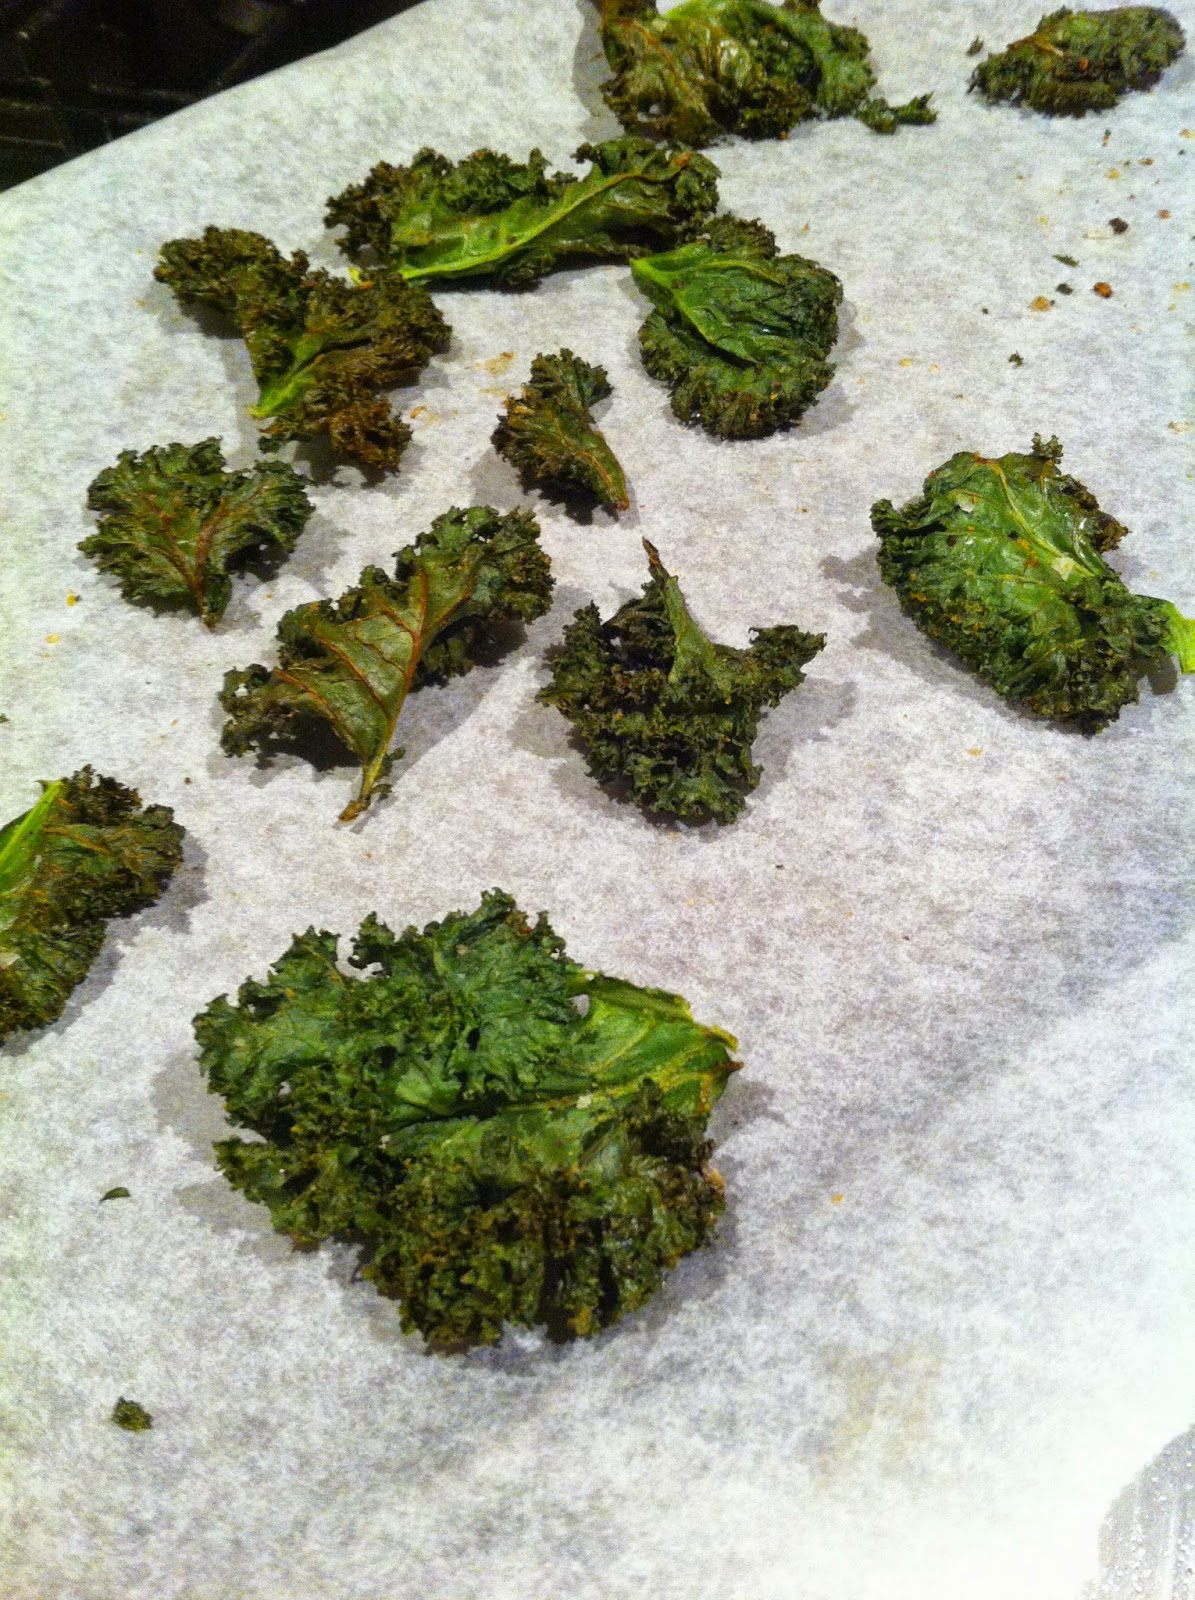
I decided to give it a go seeing as we had kale in the fridge and I was hungry as always. I followed the recipe of Oh She Glow's All Dressed Kale Chips and experimented a bit with seasonings.

I tried plain sea salt, Moroccan seasoning and paprika with garlic powder. My favourite was Moroccan seasoning but I soon learnt that the salt was a bit too much so I will opt for no salt next time. They are super easy to make, super tasty and you don't have to eat that much to feel satisfied! The only thing is that I have not found a way to store these to preserve the crisp crunch of the chips :(

Fresh out of the oven... but try not to munch on them now, as per Oh She Glow's tip, you should leave them on the tray for a few minutes to allow them to crisp up even more!


Now doesn't that just look delicious AND healthy, if you're not convinced let me tell you it is amazing! I think I'll have to make some tomorrow!

That's all for now,

Sayonara! xo

Thursday, 16 October 2014

Schwarzkopf Live Colour Ultra Brights Electric Blue Review

So, I have been thinking about dip dying my hair blue for a while now and a couple of weeks ago I just said heck, I'm going to do it! Although my hair was already bleached from my ombre, I decided to bleach it a little more to make sure that the colour came out nice and bright. My natural hair colour is dark brown and I have long straight hair.

The first time I ombre'd my hair I used a Schwarzkopf ombre kit and then got it redone by a hairdresser a few months later, so it's fair to say I have very little experience dying/bleaching hair but I went for it anyways.


The products I used to bleach my hair were purchased from Priceline here in Ausralia (and were on sale!). I bought the Innovative 30 vol. creme developer and Hi Lift Blue Blonde Highlighter Powder Bleach. To make enough bleach for my ends I used a 1:1 ratio of powder:creme developer and it covered the bleached area you can see below. As I was going for a light bleach because my hair was already bleached, I feel that the strength was perfect and I only left it in for around 25 minutes.


As soon as I washed the bleach out I could feel how dry and straw-like my hair had become so it is definitely time for me to step up my hair care routine!

After blow drying my hair I immediately applied the Schwarzkopf Live Colours Electric Blue dye (and then I read in the instructions that it should be put on damp hair -.- oh well, there's always next time). I totally forgot to time this but I think I left it in for around 30 minutes,, washed it and then let it air dry.

It turned out a very dark blue colour but after a few washes it faded to a more bright blue, and fast forward to now (2.5 weeks later) my ends are still fairly blue, the upper half of the blue has washed out and the blonde is visible (which I kinda like) but it is starting to turn a slightly blue-green colour. I've also noticed that the blue was a bit patchy (due to my severe lack of experience) but I've learnt from it, and I think I'd like it to be a bit darker too. Overall I think that this is a great sei-permanent dye, great for someone who doesn't want to fully commit to a bright colour yet and it's stay power is a lot better than what I was expecting- I've already bought 2 more blue packs and 2 purples to try sometime!

So I think it may be time for me to re-dye the blue and hopefully I'll apply a few of the things I learnt to my first time to make it even better this time! And maybe I'll write about how I dyed my hair in more depth and hopefully it'll turn out even better than before!

That's all for now,

Sayonara! xo

Saturday, 20 September 2014

Cheat Days - All Day, Err Day

This is for all of you out there who just can't accept that cheat day only comes around once a week. I confess, I am one of those people and I can't resist new and limited edition items - they could be a hit or miss but in my experience I've come across some amazing snacks.

Here in Australia, at the moment there is a Golden Ticket competition going on- much the same as in the book and movies - however in this one you don't get to meet Johnny Depp :( And sadly, I did not win a trip to the chocolate factory. But I did get to enjoy a very delicious chocolate bar.

Wonka Cookie Creamery is a "Creamy WONKA milk chocolate, cookie pieces in vanilla flavoured cream & a dash of secret sauce". Just the addition of a 'secret sauce' makes it something I need in my life. Although I don't really like Wonka chocolate this was really yummy and super cute with the little pieces. I give this snack 6.5/10.


This next snack is none other than good old Oreo's, but with a slight twist - Peanut butter and choc cream!! Who doesn't like peanut butter and chocolate?! A match made in heaven, combined with the dangerously addictive essence that seems to accompany Oreo's gives you a biscuit you're sure to gobble up in 10 seconds flat. 


Fun fact: Did you know that Oreo's are as addictive as cocaine? This is apparently true! Woah... explains a lot...


Yeah they make them in smaller packs now... probably a good idea as I don't stop until I've finished the pack.

Twist... Lick... and it's gone, sorry no time to dunk when I'm shoving it in my face. I give this snack 9.5/10. Utterly decadent. I hope these are around for a while.


This final snack is a chocolate bar that Australians should be familiar with - Cherry Ripe. When I was younger I always used to avoid these in the favourites boxes but as I got older I started to enjoy them more. I've seen this at the shops for a while but never really took an interest but on a whim yesterday I bought it. I'm not a massiv fan of dark chocolate but my my this was soooo good!


This is a 90th anniversary Limited Edition Dark Ganache Cherry Ripe. The description is amazing like all those on chocolate bars here "Ripe juicy cherries & coconut with an extra layer of smooth dark chocolate ganache in Old Gold rich dark chocolate". Oh my gosh I'm drooling now. Who doesn't like the sound of that?


This is one of those cases where the limited edition product may be better than the original... gosh Cadbury, it took you long enough, 90 years! ;) The dark chocolate ganache in the middle was oozy and to die for and made eating this chocolate a truly decadent experience so I would reommend you snatch one of these up before they're gone! I give this snack 9/10.

Apologies if today is not your cheat day but seriously just do it because you're only alive for a certain amount of time so why not eat nice things? - life motto.

That's all for now

Sayonara! xo

Sunday, 7 September 2014

Paris Kids 'Nail Tip - One Touch Type'

Ok so it's no secret that I have an addiction to all things cute and nail polish/art so these caught my eye immediately! I have actually bought fake nails from this brand before 2 years ago and loved the easy one touch process to get them on and they were so pretty and sparkly!! *.* 


 I got these from a chain store called Sanki in Japan, but you can also get them at various stores that stock Paris kids products and Paris kids stores like the one I went to in Harajuku on Takeshita Street.  

Because I was in Harajuku I wanted to embrace the 'Harajuku Style' of crazy, cute and fun so I picked these up!

 They come with 24 nails of various sizes so that you are guaranteed to find the right fit for you. The top layer is embellished with little pearls, flowers and strawberries and the bottom layer is just a pale pink ombre glitter nail. The instructions and information are all in Japanese but don't worry, there isn't much to them, just match your nail size to the fake ones and stick 'em on!

 So many nails! <3


Although when I got back from Japan and looked at these I thought "how tacky" but they actually look super cute on and people actually thought I got my nails done at a salon! I chose to mix my nails up with some plain glitter nails and some with embellishments. The one touch type glue is sort of like a gel sticky adhesive attached to the nail which makes application easy, mess and hassle free! 

Even though my nails were pretty secure, after a couple of days they felt a little flimsy and like they were going to fall off, so I used a nail glue from Daiso to reattach them and they stayed for a week! And  I was super impressed that they didn't fall off at work- my nail polish has a reputation of chipping badly at work. Also, after a week of rough treatment by me it was understandable that some of the strawberries fell off and a couple of the petals of the flowers fell off but other than that I loved these!

And these are SUPER cheap at only 324 yen ($3.20 AUD)! And I must add that they aren't just cheap ones of poor quality... they are inexpensive, great quality, cute and are the perfect way to spruce up your nails for spring!

That's all for now,

Sayonara! xo


Thursday, 4 September 2014

Japanese Snacktime #3 – Gari Gari Kun Ice Blocks


Gari Gari Kun is probably the most popular brand of ice blocks In Japan and it has been around for many years (since my mum was a kid) and they pretty much represent summer in Japan. They are super cheap delicious ice blocks that come in the classic Samurai Blue flavour (soda flavour), many different fruit flavours and also various limited edition flavours (some very very strange). 


This is the classic Samurai blue flavour which tastes like soda flavour and is just very refreshing and delicious! While I did not eat this one, the price is pretty low at 62 yen (60 cents AUD) and it is a classic, I give this snack 8/10. The other one pictured is Japanese pear or nashi pear flavour and it tastes EXACTLY like a nashi pear! The resemblance is extraordinary! One thing I’ve noticed with Japanese snacks and Gari Gari Kun in particular is the match of the true flavour of the food and the ice block form- I don’t get how they do it but it blows my mind! I give this snack 8.5/10. 

I should also explain the unique texture of Gari Gari Kun ice blocks- the outside is like a very hard ice block- like a regular ice block you’d find in Australia, but the inside layer is kind of like a snow cone- it is less dense than the outer layer and is very easy to bite through!

A couple of limited edition flavours I saw while I was in Japan were the Kiwi Fruit flavour and the Gari GaReeeeN flavour.


I really enjoyed the Kiwi flavour although it tasted more like a sweet green apple flavour to me – if you ever see it I definitely recommend trying it! I give this snack 9/10.


The name of the other flavour is a very funny pun that combines the two names of ‘Gari Gari Kun’ and the famous Japanese band ‘GReeeeN’ – I totally thought it was a great play on words and made me want to buy it- as well as the great packaging combining the GReeeeN logo (smile) and the well-known wide mouth of Gari Gari Kun. Gosh the packaging and advertising in Japan is crazy good! Anyways I didn’t enjoy the ice block as much as the packaging – it was a green apple flavoured ice block with little coloured sherbet drops through the middle. It was kinda fun to eat but nothing too special with regards to flavour. I give this snack 6/10 – but the packaging would have to score a 9/10. 

And let’s not forget that this is the brand that created the infamous Corn Potage (corn soup) flavoured ice blocks, continuing with stew flavour and now - *DUN DUN DUN* Neapolitan (spaghetti with tomato sauce). Having tried corn potage flavour 2 years ago out of curiosity, and not minding the flavour (although it was very weird to eat something that tasted EXACTLY like corn soup in the form of an ice block), I decided to try the Neapolitan flavour this time.
Warning signal #1- it was reduced to 30 yen at the supermarket (30 cents AUD)… not a good sign considering Japanese people eat a lot of crazy things and this was reduced drastically to try and sell them.
Warning signal #2 – all the tasting videos on YouTube all pretty much saying that it’s disgusting.
…Aaaand then I bought it and ate it…


Not the best idea I’ve had. It tasted like tomato juice and it even had little bits of tomato jelly through the middle- YUCK! So then I forced my family to try it as well *mwahahahaha*. One of the most foul things I’ve ever tasted, I give this snack 1/10… It gets one point because of the company’s bravery to release this flavour and the whole experience- like when are you ever going to eat a spaghetti flavoured ice block?... and the answer is now NEVER AGAIN!

I hope you enjoyed my very long post about Gari Gari Kun ice blocks– thank you if you made it this far! If you’ve ever tried Gari Gari Kun I would love to hear what flavours you've tried and your opinions on them!

That’s all for now,

Sayonara! xo